Peanut butter and dogs—name a more iconic duo. We’ll wait.
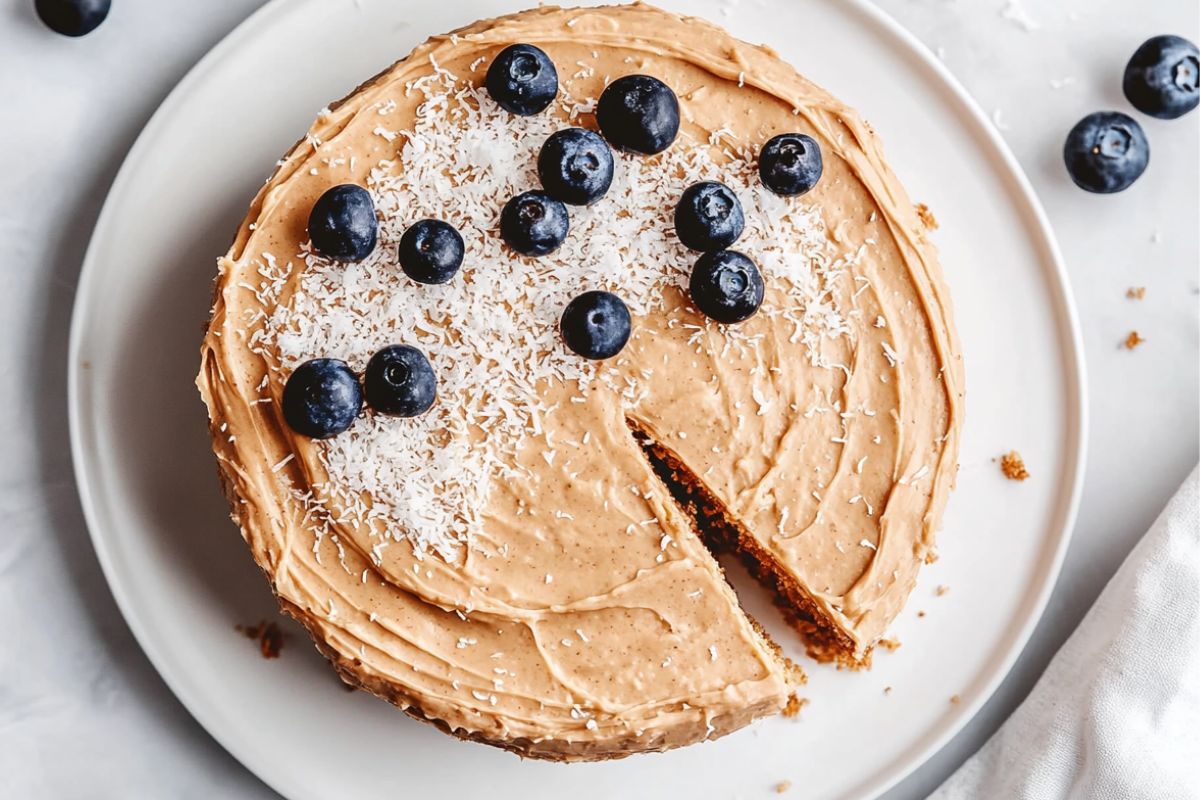
Peanut Butter Dog Cake: A Delicious and Healthy Treat for Your Furry Friend is everything your pup dreams of (and probably deserves daily). It’s soft, moist, and packed with that nutty flavor dogs go nuts for—plus, it’s made with wholesome, pup-safe ingredients you can feel great about.
Perfect for birthdays, adoption anniversaries, or just because they finally didn’t bark at the mailman, this cake is a celebration in every slice.
No artificial stuff, no complicated steps—just pure peanut butter bliss in cake form. Ready to spoil your best friend? Let’s get baking!
Peanut Butter Dog Cake Recipe
Why Peanut Butter?
Peanut butter is a fan favorite among dogs, and it’s easy to see why. It’s packed with healthy fats, protein, and essential vitamins that help support a dog’s energy and overall health. However, it’s important to use peanut butter without any artificial sweeteners, especially xylitol, which can be toxic to dogs. Make sure you pick a peanut butter that’s free of harmful additives for the safest treat.
Ingredients
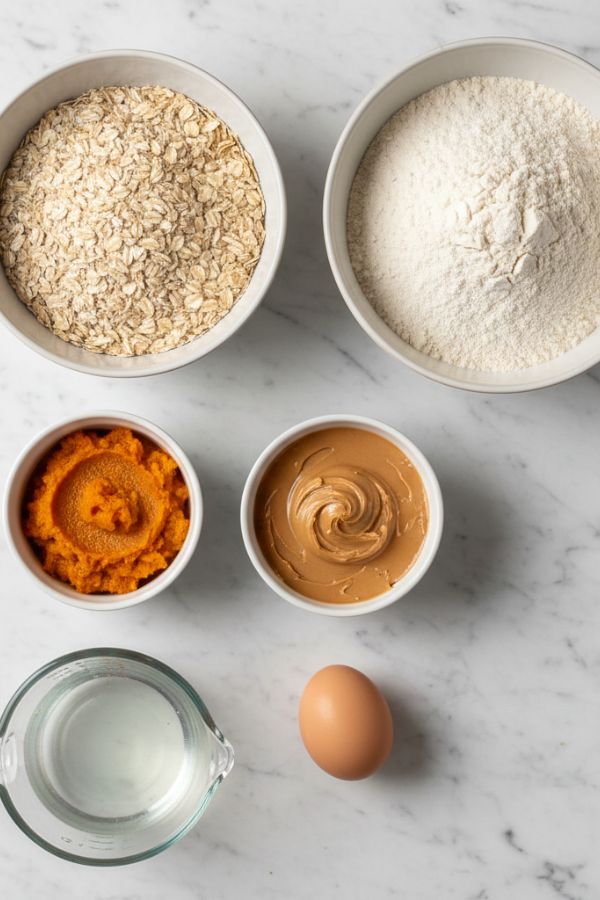
- 1 cup of whole wheat flour – A good source of fiber, whole wheat flour helps support your dog’s digestive health.
- 1/4 cup of rolled oats – Oats are a great source of fiber and are gentle on a dog’s digestive system.
- 1/2 cup of peanut butter – Natural, unsweetened peanut butter, free from xylitol, provides a delicious flavor and healthy fats.
- 1/2 cup of canned pumpkin – Pumpkin is rich in vitamins, fiber, and antioxidants, supporting your dog’s digestive system and immune health.
- 1 egg – The egg helps bind the ingredients together and adds protein to the cake.
- 1/4 cup of water or low-sodium broth – To help achieve the right consistency for your cake batter.
Instructions
Step 1: Preheat the Oven
Set your oven to 350°F (175°C) to get it ready for baking. Grab an 8-inch round cake pan and grease it lightly with a dog-safe oil (like coconut oil) or line it with parchment paper to prevent sticking. Place the pan on your counter so it’s prepped for the batter.
Step 2: Combine Dry Ingredients
In a large mixing bowl, measure 1 cup whole wheat flour and ¼ cup rolled oats. Stir with a spoon or whisk for 20–30 seconds to blend evenly, ensuring no clumps of flour remain. This creates a hearty, fiber-rich base for the cake.
Step 3: Mix Wet Ingredients
In a separate medium bowl, combine ½ cup peanut butter (xylitol-free, just peanuts or peanuts and salt), ½ cup canned pumpkin (plain, not pie filling), 1 egg, and ¼ cup water or low-sodium broth. Whisk thoroughly for 1–2 minutes until the mixture is smooth and well combined, like a thick, creamy batter. Scrape the sides to ensure all ingredients are incorporated.
Step 4: Check Wet Mixture Consistency
Inspect the wet mixture—it should be creamy but not runny, like a thick smoothie. If it’s too thick to stir easily, add 1 tsp more water or broth and mix for 10 seconds. If too thin, add 1 tsp more peanut butter. This ensures the batter blends well with the dry ingredients.
Step 5: Combine Wet and Dry Ingredients
Gradually pour the wet mixture into the bowl with the dry ingredients, stirring with a spoon or spatula as you go. Mix for 1–2 minutes until you form a thick, uniform batter. If the batter seems too dry and crumbly, add 1–2 tsp more water or broth and stir until smooth and spreadable, like a dense cake batter.
Step 6: Prep the Cake Pan
Double-check that your cake pan is greased or lined with parchment paper. If using parchment, cut a circle to fit the bottom and lightly grease the sides for easy release. This step ensures the cake pops out cleanly after baking.
Step 7: Pour and Spread Batter
Pour the batter into the prepared 8-inch cake pan. Use a spatula to spread it evenly, smoothing the top for a uniform bake. Tap the pan gently on the counter to remove air bubbles and ensure the batter settles properly.
Step 8: Bake the Cake
Place the pan on the middle rack of the oven. Bake for 25–30 minutes, until a toothpick inserted in the center comes out clean or with just a few crumbs. Check at 25 minutes—press the top lightly; it should feel firm but springy. If not done, add 2–3 more minutes and recheck.
Step 9: Cool in the Pan
Remove the pan from the oven and let the cake cool in the pan for 10 minutes. This helps it set and hold its shape. Place the pan on a wire rack or heat-safe surface to speed up cooling and prevent sogginess.
Step 10: Finish Cooling
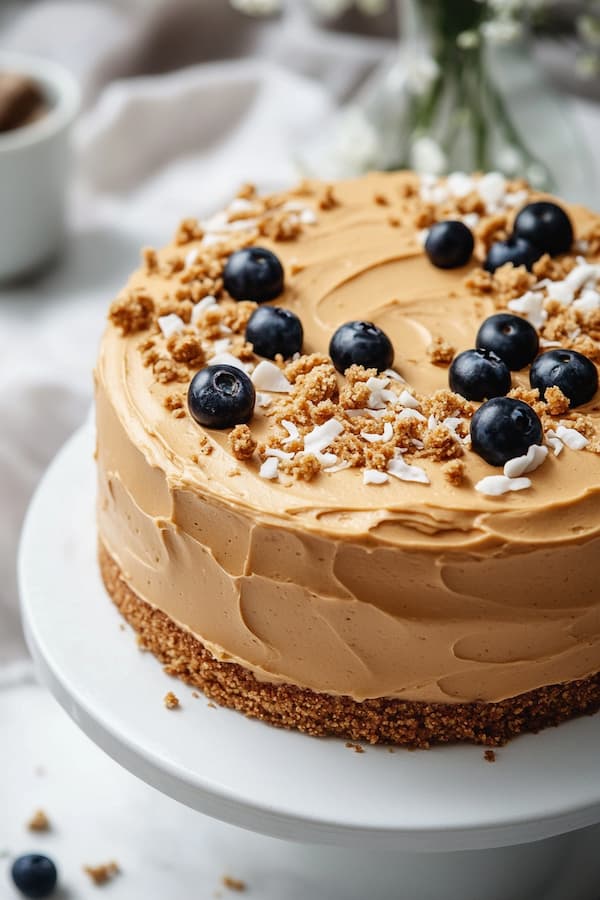
Carefully transfer the cake to a wire rack by running a knife around the edges to loosen it, then inverting the pan or lifting out the parchment. Cool completely, about 30–40 minutes, to room temperature. Don’t frost or serve warm, as it can upset pup tummies.
Step 11: Frost (Optional)
For extra flair, frost the cake once fully cooled. Spread a thin layer of xylitol-free peanut butter, plain yogurt, or cottage cheese over the top using a spatula or butter knife. Apply gently to cover evenly without crumbling the cake. Keep it thin to avoid overwhelming your pup with richness.
Step 12: Store and Serve
Slice the cake into small, pup-sized pieces (about 1–2 inches) and serve one to your dog as a special treat. Store leftovers in an airtight container in the fridge for up to 5 days or freeze for 3 months. Thaw frozen slices in the fridge overnight before serving.
Alternative Ingredients
Offer alternatives for dogs with allergies or dietary restrictions:
- Flour: Suggest using gluten-free flour (like rice flour or coconut flour) for dogs with wheat allergies or sensitivities.
- Peanut Butter Alternatives: If your dog is allergic to peanuts, you could swap peanut butter with almond butter (again, free from xylitol) or sunflower seed butter.
- Pumpkin Alternatives: If pumpkin is not available or your dog doesn’t tolerate it well, you could use sweet potato puree instead, as it’s also rich in fiber and vitamins
Potential Concerns and Warnings
- Overfeeding: Remind readers that even though these ingredients are safe, overfeeding can lead to weight gain and digestive issues.
- Allergies: Always encourage readers to double-check for any potential allergies before introducing new ingredients to their dog’s diet.
- Choking Hazards: If using any decorations or toppings, ensure they are small and easy to eat without posing a choking risk, especially for smaller dogs.
Serving Tips:
- Portion control: While this peanut butter dog cake is healthy, it’s still important to serve it in moderation. Depending on your dog’s size, you can slice the cake into smaller portions and save the rest for later.
- Celebrate in style: This cake is great for birthdays, adoption anniversaries, or just as a special treat for your furry friend. Decorate with dog-friendly treats, like dog biscuits or a drizzle of yogurt for a festive touch!
Why Dogs Will Love This Cake
The combination of peanut butter and pumpkin in this cake makes it super flavorful and satisfying for dogs. Peanut butter is rich in taste, and the pumpkin adds a bit of sweetness, making the cake irresistible.
The added oats and flour provide a bit of texture and a healthy boost to their diet. Plus, this homemade treat is free from preservatives, artificial colors, and sugars, making it a much healthier option than store-bought cakes.
Conclusion
Making a peanut butter dog cake for your pup is an easy and fun way to show your love. With wholesome ingredients, you’ll be able to bake a treat that’s both delicious and nutritious. Whether it’s for a special occasion or just because, your dog is sure to enjoy every bite. Just be sure to watch for any food sensitivities and always choose safe, natural ingredients. Your dog’s tail will wag with happiness every time they enjoy a slice of this peanut butter dog cake!