
Let’s be real—when it’s hot outside, your dog still wants treats. And you? You want something easy, healthy, and freezer-stockable. That’s where frozen banana dog treats come in. They’re creamy, naturally sweet, and packed with potassium, fiber, and good vibes.
Bananas make the perfect base for pup pops and cool cubes. Whether your dog’s into peanut butter, berries, or coconut, I’ve got you covered with three frozen banana treat recipes that’ll make you the most popular human in the house (if you aren’t already).
No baking. No weird ingredients. Just simple, frozen fun.
Frozen Dog Treats with Banana
#1 Peanut Butter Banana Freezer Bites
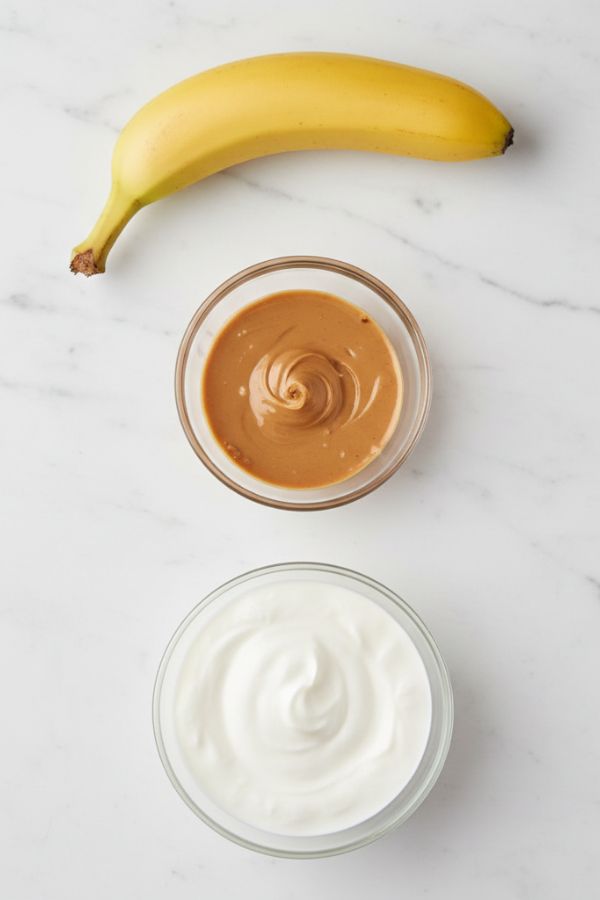
Ingredients
- 1 ripe banana (mashed smooth)
- 2 tablespoons natural peanut butter (xylitol-free, always)
- 1/2 cup plain Greek yogurt
Instructions
Step 1: Mash the Banana
Grab your ripe banana—it should be soft and brown-spotted for max sweetness. Peel it and place it in a mixing bowl. Use a fork or potato masher to mash it thoroughly for 30–45 seconds until it’s silky smooth, like creamy oatmeal, with no chunks left. If it’s too firm, microwave the peeled banana for 10 seconds to soften.
Step 2: Add Peanut Butter and Yogurt
To the mashed banana, add 2 tbsp natural peanut butter (xylitol-free, critical for pup safety) and ½ cup plain Greek yogurt (unsweetened, no additives). Stir with a spoon for 1–2 minutes until the mixture is thick and smooth, like frosting you could pipe. Scrape the sides of the bowl with a spatula to ensure no peanut butter hides out.
Step 3: Check the Consistency
Give the mixture a quick stir and check its texture. It should be thick but scoopable, like a dense smoothie. If it’s too stiff to spoon easily, add a splash of water (1 tsp at a time, up to 1 tbsp) and mix for 10 seconds. If it’s too runny, add ½ tsp more peanut butter. This ensures it freezes solid without being icy.
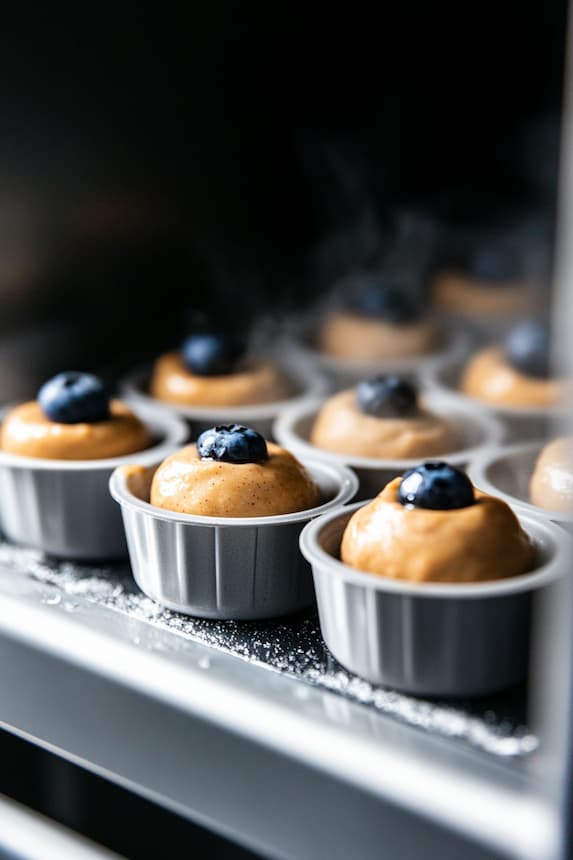
Step 4: Prep Your Molds
Get your silicone molds, ice cube trays, or mini muffin tins ready—paw or bone shapes are peak dog vibes. If using ice cube trays, lightly spray with cooking spray and wipe off excess for easy release. No molds? Line a baking sheet with parchment paper for dollops. Place on a flat surface to avoid spills.
Step 5: Fill the Molds
Use a spoon to scoop the mixture into each mold, filling them about ¾ full to allow for slight expansion. For a fun twist, drop one blueberry in the center of each mold before filling to the top. Smooth the tops with the back of a spoon for a clean look. If using a baking sheet, spoon 1-tbsp dollops, spacing them 1 inch apart.
Step 6: Freeze Solid
Carefully place the molds or baking sheet in the freezer on a flat shelf to keep them level. Freeze for at least 4 hours, or overnight for best results, until the bites are completely solid. Check by pressing one—if it’s hard and doesn’t give, you’re good. Smaller molds might set in 3.5 hours, but don’t rush it.
Step 7: Pop Out and Store
Once frozen, pop the bites out by twisting silicone molds or running ice cube trays under warm water for 5–10 seconds to loosen. Peel dollops off parchment paper if using a baking sheet. Transfer to a freezer-safe bag or container, labeled “Dog Treats” to avoid mix-ups. Store in the freezer for up to 2 weeks.
Step 8: Serve to Your Pup
Grab a frozen bite and serve it cold to your pup as a cooling treat. Perfect for hot days or post-playtime chill sessions. Watch them chomp happily, and limit to 1–2 bites a day depending on their size.
#2 Banana Berry Froyo Cubes
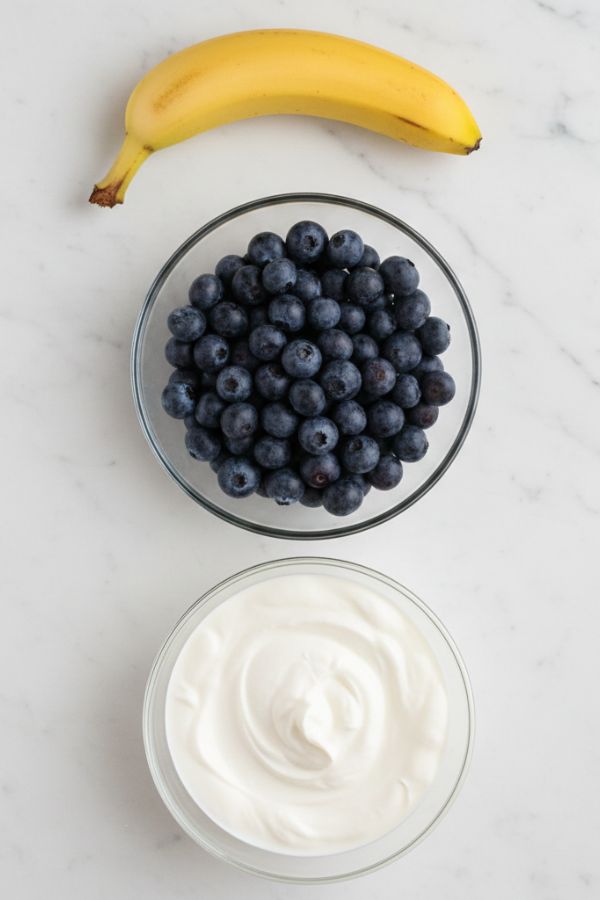
Ingredients
- 1 banana (sliced or mashed)
- 1/2 cup berries (blueberries or strawberries—your call)
- 1/2 cup plain Greek yogurt
Instructions
Step 1: Prep the Ingredients
Grab your 1 banana (ripe, brown-spotted for sweetness) and ½ cup berries (blueberries or strawberries, fresh or frozen). Peel the banana and slice into chunks. If using fresh berries, rinse and pat dry. If frozen, let them thaw slightly for easier blending. Place both in a blender or food processor with ½ cup plain Greek yogurt (unsweetened, no additives).
Step 2: Blend Until Smooth
Pulse the mixture for 20–30 seconds until it’s smooth like a smoothie, with no visible berry or banana chunks. Scrape down the sides with a spatula to catch any stragglers. If it’s too thick to pour, add a splash of water or goat milk (1 tsp at a time, up to 1 tbsp) and blend for 10 more seconds. The mix should be creamy and pourable.
Step 3: Check the Texture
Give the blend a quick stir and check its consistency. It should be thick but fluid, like a milkshake. If it’s too runny, add ½ tsp more yogurt and blend briefly. If it’s too dense, another tsp of liquid will loosen it up. This ensures it freezes evenly without being too icy.
Step 4: Prep Your Molds
Get your silicone molds or ice cube trays ready—bone, heart, or star shapes add extra flair. If using ice cube trays, lightly spray with cooking spray and wipe off excess for easy release. No molds? Line a baking sheet with parchment paper for dollops. Place on a flat surface to prevent spills.
Step 5: Pour into Molds
Carefully pour the mixture into each mold, filling them about ¾ full to allow for expansion. Use a spoon to scrape the last bits from the blender—don’t waste that goodness. For baking sheet dollops, spoon 1-tbsp portions, spacing them 1 inch apart. Tap the tray gently to settle the mix and pop air bubbles.
Step 6: Freeze for 4+ Hours
Place the molds or baking sheet in the freezer on a flat shelf to keep them level. Freeze for at least 4 hours, or overnight for best results, until the cubes are completely solid. Check by pressing one—if it’s firm, you’re set. Fancy shapes might take closer to 5 hours to fully harden.
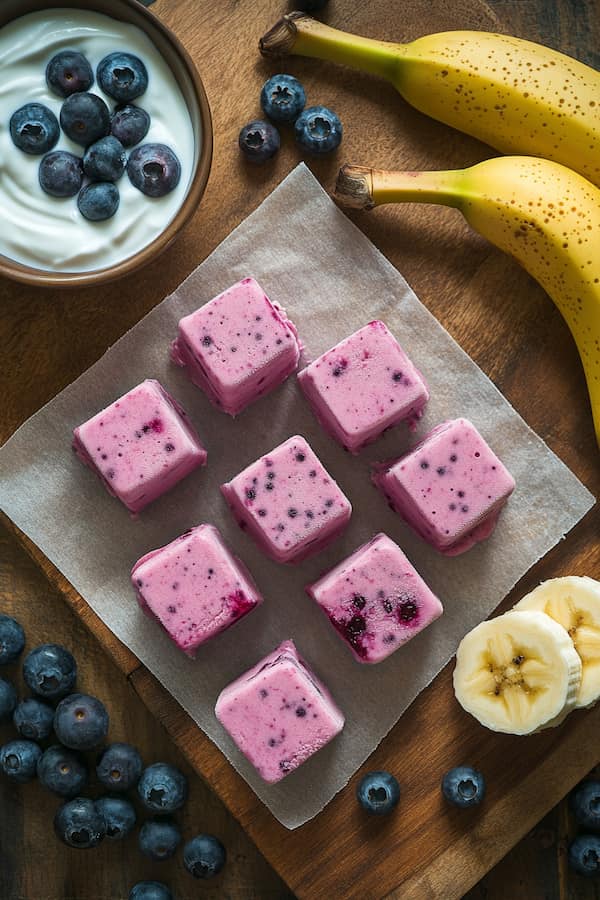
Step 7: Pop Out and Store
Once frozen, pop the cubes out by twisting silicone molds or running ice cube trays under warm water for 5–10 seconds. Peel dollops off parchment paper if using a baking sheet. Transfer to a freezer-safe bag or container, labeled “Pup Treats” to avoid confusion. Store in the freezer for up to 2 weeks.
Step 8: Serve with Swagger
Grab a cube or two and serve straight from the freezer to your pup. Hand it over like the dog mom of the year, and watch them enjoy the frosty goodness. Limit to 1–2 cubes daily, depending on pup size, for a cool, refreshing treat.
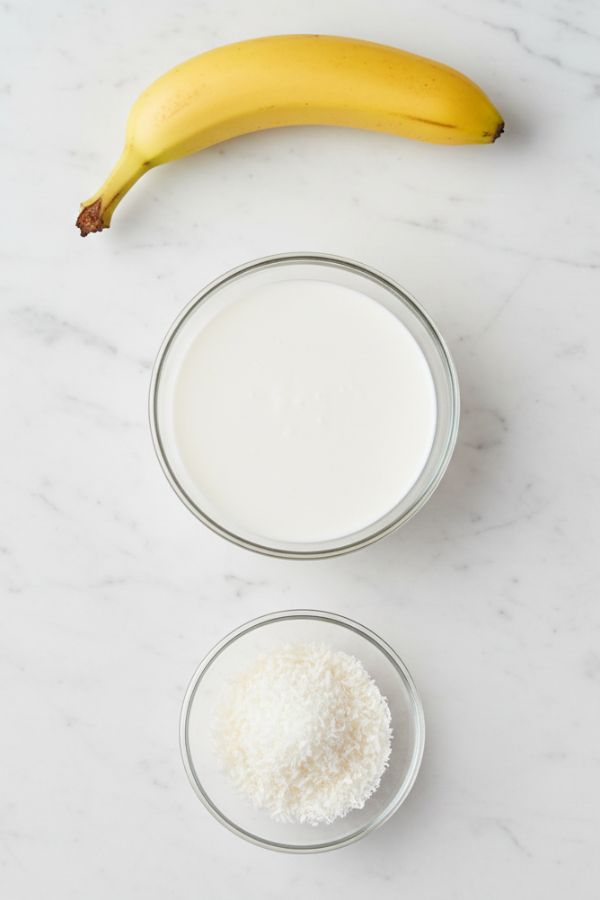
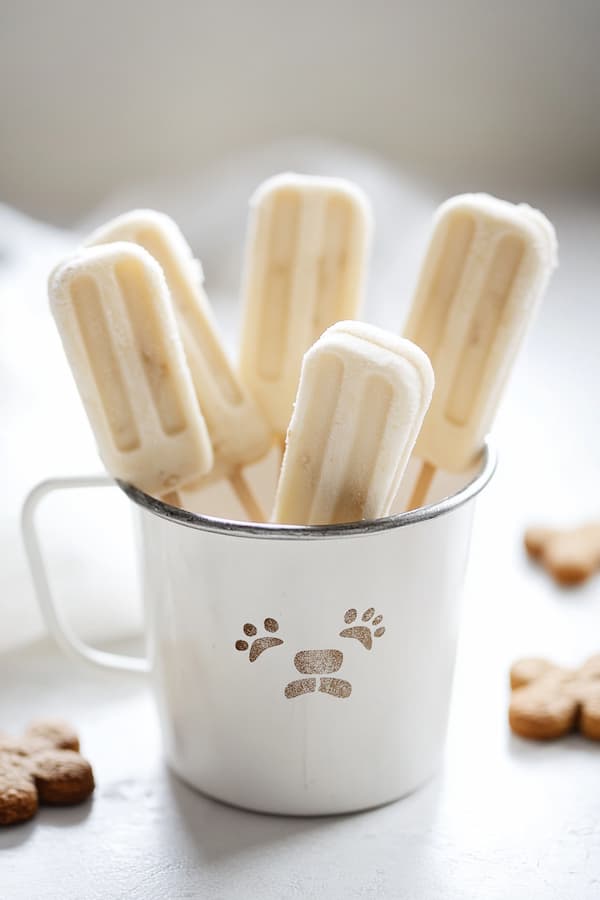
#3 Banana Coconut Pup Pops
Ingredients
- 1 banana (mashed)
- 1/4 cup unsweetened coconut milk
- 1 tablespoon unsweetened shredded coconut (optional but delicious)
Instructions
Step 1: Mash the Banana
Grab your 1 banana—it should be ripe and brown-spotted for piña colada-level sweetness. Peel it and place in a mixing bowl. Use a fork or potato masher to mash it thoroughly for 30–45 seconds until it’s silky smooth, with no lumps. Think tropical smoothie vibes. If it’s too firm, microwave the peeled banana for 10 seconds to soften.
Step 2: Add Coconut Milk
Pour in ¼ cup unsweetened coconut milk (check for no additives). Stir with a spoon for 30–45 seconds until the mixture is creamy and pourable, like a thin milkshake. Scrape the sides of the bowl to blend fully. The coconut milk should make it smooth and slightly runny but not watery.
Step 3: Mix in Shredded Coconut
If using, add 1 tbsp unsweetened shredded coconut for a chewy texture. Fold it in gently with a spatula for 15–20 seconds to distribute evenly. The coconut adds a fun, tropical crunch, but skip it if your pup prefers smoother treats. Check that the mix is still pourable after adding.
Step 4: Check the Consistency
Stir the mixture and check its texture. It should be smooth and slightly thick, like a melted popsicle. If it’s too thick to pour, add 1 tsp more coconut milk and mix for 10 seconds. If it’s too runny, add ½ tsp mashed banana or a pinch more shredded coconut. This ensures it freezes solid without being too icy.
Step 5: Prep Your Molds
Get your silicone molds or mini ice cube trays ready—paw or bone shapes are doggy chic. If using ice cube trays, lightly spray with cooking spray and wipe off excess. For pupsicle sticks, have dog biscuits ready to insert later. No molds? Line a baking sheet with parchment paper for dollops. Place on a flat surface to avoid spills.
Step 6: Fill the Molds
Pour or spoon the mixture into each mold, filling them about ¾ full to allow for expansion. For a pupsicle on a stick, fill molds halfway, insert a dog biscuit upright in the center, then top with more mixture. Smooth the tops with a spoon. For baking sheet dollops, spoon 1-tbsp portions, spacing them 1 inch apart. Tap the tray to settle the mix.
Step 7: Freeze Overnight
Place the molds or baking sheet in the freezer on a flat shelf to keep them level. Freeze for 6–8 hours, ideally overnight, until the pops are completely solid. The coconut milk needs extra time to set firmly. Check by pressing one—if it’s hard, you’re good to go.
Step 8: Pop Out and Store
Once frozen, pop the pops out by twisting silicone molds or running ice cube trays under warm water for 5–10 seconds. Peel dollops off parchment paper if using a baking sheet. Transfer to a freezer-safe bag or container, labeled “Pup Pops” to avoid mix-ups. Store in the freezer for up to 2 weeks.
Step 9: Serve with Style
Grab a pop and serve it cold to your pup, holding it by the biscuit stick if you went that route. Expect major tail wags and those “gimme another” eyes. Limit to 1 pop daily for small dogs, 1–2 for bigger pups, to keep it chill and healthy.
Storage & Serving Tips
- Store frozen treats in a freezer-safe container or silicone bag
- Use parchment between layers if they stick
- Keep for up to 2 months (but let’s be real—they won’t last that long)
- Always supervise your pup when snacking on frozen goodies
- Let thaw for 1–2 mins for smaller or senior dogs who prefer a softer bite
Why Banana?
- It’s dog-safe
- Full of potassium, fiber, and vitamin B6
- Naturally sweet—no sugar added, ever
- Blends like a dream
- Gentle on sensitive bellies
Wrapping Up
And there you have it—three frosty ways to turn bananas into pure tail-wagging joy. Whether your pup’s into peanut butter, berries, or a little tropical flair, these frozen treats are proof that healthy can still mean delicious. Stock that freezer, grab a mold (or a spoon), and prepare to be your dog’s favorite person—more than usual. 🐾🍌