Meat lovers, this one’s for your pup.
Dog Treats with Meat: 4 Protein-Packed Recipes for Happy, Healthy Pups is all about turning real meat into drool-worthy bites that fuel energy, support strong muscles, and taste downright irresistible. Whether you’ve got leftover turkey, some lean beef, or chicken just waiting to be turned into treats—these recipes keep it simple, nutritious, and packed with tail-wagging flavor.
Perfect for active pups, picky eaters, or dogs who just go wild for the smell of something sizzling, these meaty treats are a must-have in your homemade snack rotation.
Grab your protein, preheat the oven (or fire up the pan), and let’s give your dog a treat worth sitting for.
Dog Treats with Meat
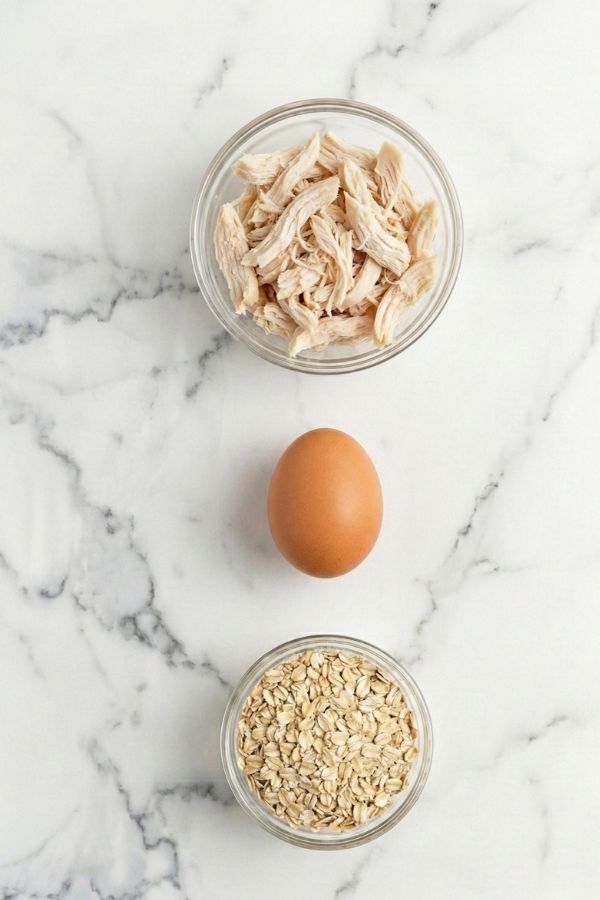
#1 Chicken & Oat Soft Bites
Ingredients:
- 1 cup cooked chicken breast (finely chopped or shredded — lean, unseasoned)
- 1 egg (adds moisture and helps bind the dough)
- 1/2 cup rolled oats (or oat flour — use oat flour for a smoother texture)
- Optional: 1 tbsp finely shredded carrot or parsley (adds color, fiber, and nutrients)
Instructions:
Step 1: Preheat the Oven
Preheat your oven to 350°F (175°C).
Line a baking sheet with parchment paper or use a silicone baking mat to prevent sticking and ensure easy cleanup.
Step 2: Mix the Ingredients
In a medium bowl, combine the shredded chicken, egg, and oats.
Stir until you get a sticky, moldable dough. If you’re using optional carrot or parsley, fold it in now. The mixture should hold its shape but not be runny.
If it feels too dry, add a splash of water.
If it’s too wet, sprinkle in a little more oats.
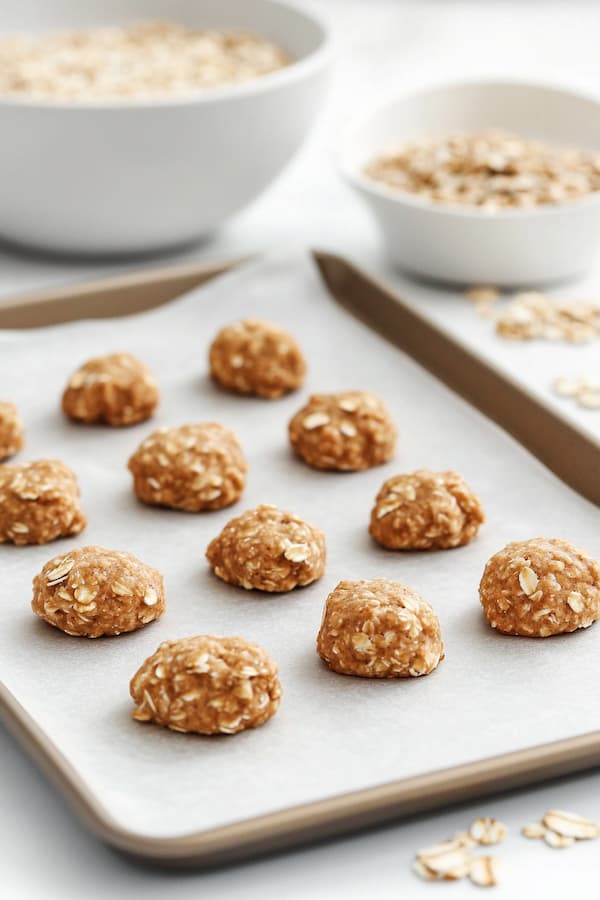
Step 3: Shape Your Treats
Scoop out teaspoon-sized portions of dough and roll them into balls or flatten into small discs.
You can also press the dough into silicone molds for fun shapes like bones or paws.
Tip: Wet your fingers slightly if the dough sticks to your hands.
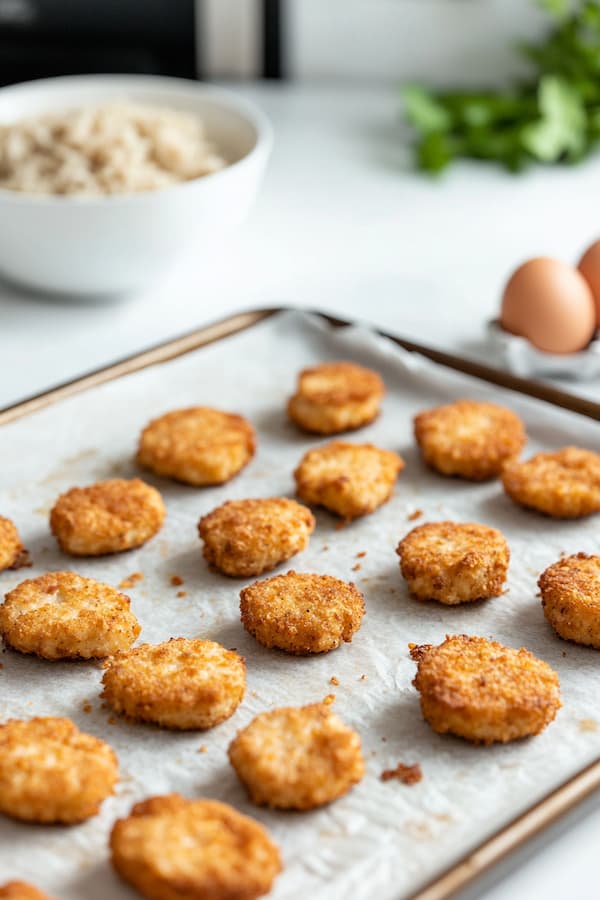
Step 4: Bake
Place treats on the prepared baking sheet and bake for 15–18 minutes, or until the edges are lightly golden and the centers are set.
Avoid overbaking to keep them soft—these are meant to be gentle on teeth.
Step 5: Cool and Store
Transfer to a wire rack to cool completely before serving.
Store in an airtight container in the fridge for up to 5 days, or freeze in small portions for up to 2 months.
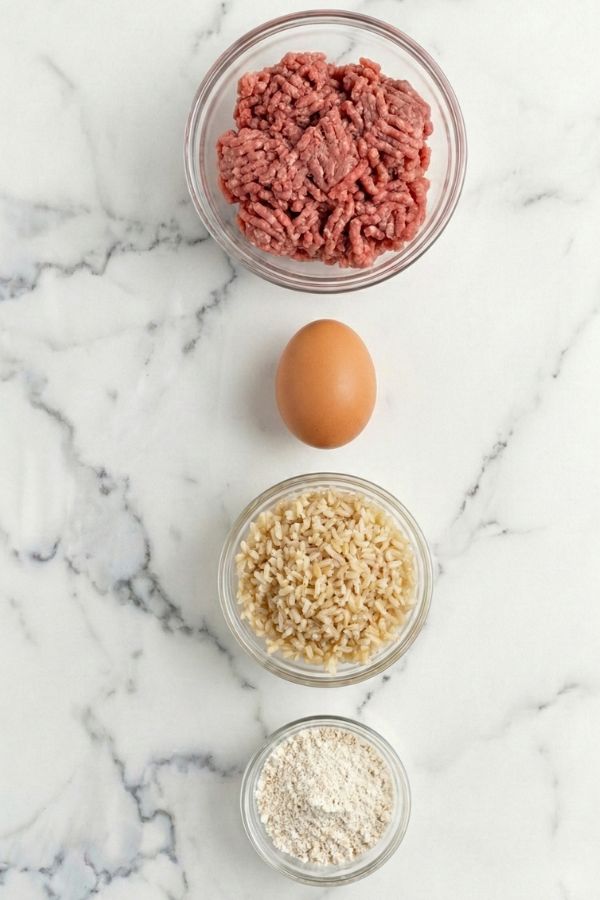
#2. Beefy Training Nuggets
Ingredients:
- 1/2 lb ground beef (lean — cooked and cooled; avoid added salt or seasonings)
- 1 egg (adds moisture and acts as a binder)
- 1/2 cup cooked brown rice (cooled — adds fiber and helps hold the dough together)
- 1/4 cup oat flour or whole wheat flour (for structure; choose oat flour for gluten-free)
Instructions:
Step 1: Cook the Beef
Brown the ground beef in a skillet over medium heat, breaking it into small crumbles as it cooks.
Once fully browned with no pink remaining, drain off any excess fat to keep the treats lean and easier to digest.
Let the cooked beef cool completely before mixing it with the other ingredients. Warm meat can partially cook the egg too early and affect the dough texture.
Step 2: Mix the Dough
In a large mixing bowl, combine the cooled ground beef, egg, cooked brown rice, and flour.
Use a spoon or your hands to mix until the dough is soft and holds together, but not overly wet.
- If it feels too dry, add a splash of water or a little more egg.
- If it’s too sticky, add a teaspoon of flour at a time until manageable.
Consistency is key: You want a dough that’s firm enough to shape but moist enough to remain tender when baked.
Step 3: Form the Nuggets
Scoop out small portions of the dough—about a teaspoon each—and roll them into balls or flatten into mini nuggets using your hands.
Aim for uniform sizes so they bake evenly. These small treats are perfect for training sessions or pocket-sized snacks on walks.
Bonus tip: Lightly dampen your hands with water to prevent sticking while shaping.
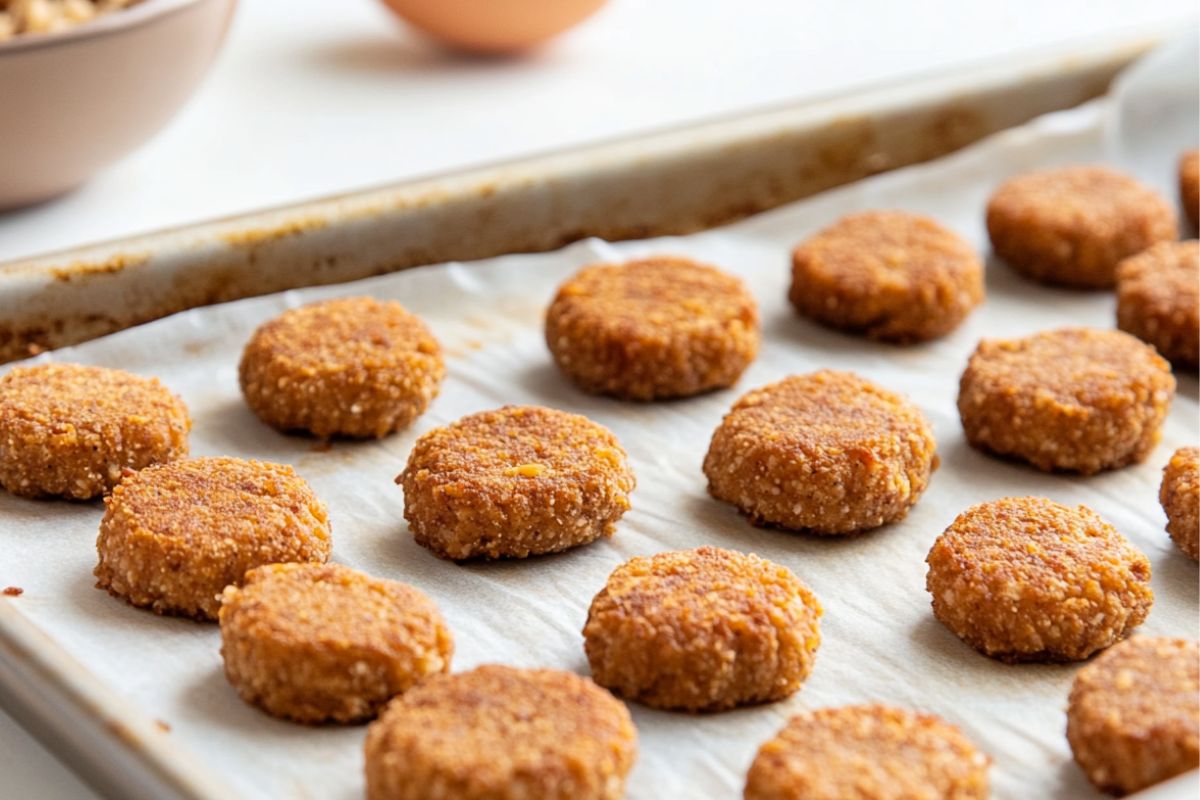
Step 4: Bake the Nuggets
Preheat your oven to 350°F (175°C). Line a baking sheet with parchment paper for easy cleanup.
Arrange the nuggets on the tray with a little space in between. Bake for 20–22 minutes, or until the edges are golden and the treats feel set.
For extra crispness, flip them halfway through baking so both sides cook evenly.
Step 5: Cool and Store
Once baked, transfer the nuggets to a wire rack and let them cool completely. This helps the texture firm up and prevents steam from softening them during storage.
Store in an airtight container in the fridge for up to 5 days, or freeze in small batches for up to 2 months.
Serve cold or lightly warmed—either way, your dog will love them.
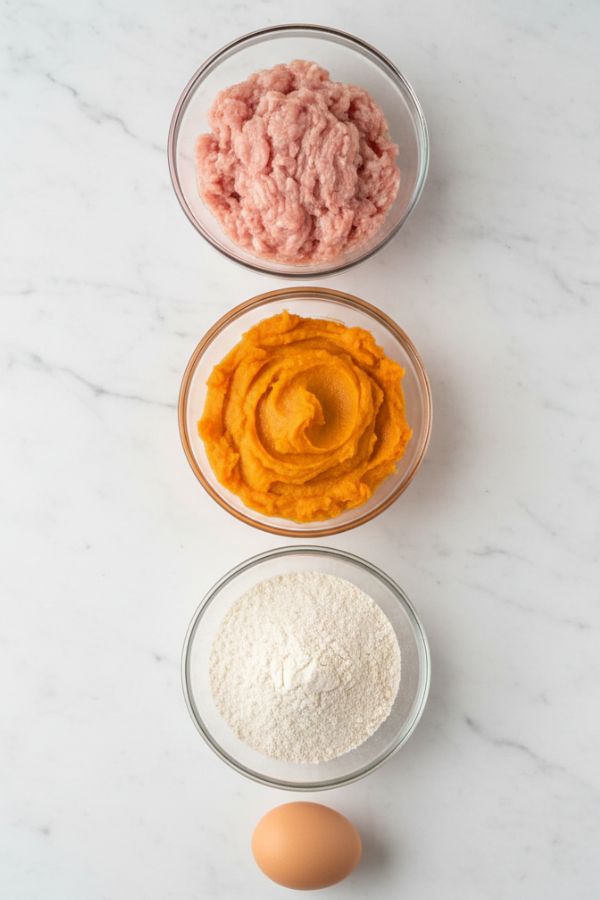
#3. Turkey & Sweet Potato Meatballs
Ingredients:
- 1 cup ground turkey (cooked — lean and unseasoned, ideal for sensitive stomachs)
- 1/2 cup mashed sweet potato (cooked and cooled — provides fiber, nutrients, and natural binding)
- 1/4 cup oat flour (or finely ground oats — adds structure and is gluten-free)
- 1 egg (for moisture and binding)
Instructions:
Step 1: Pre-Cook the Turkey
In a non-stick skillet over medium heat, brown the ground turkey thoroughly.
Break it up into small crumbles as it cooks. Do not add salt, oil, or seasoning, as these are not dog-friendly.
Once fully cooked and no pink remains, drain any excess liquid to prevent a greasy dough.
Let the turkey cool slightly before combining it with the other ingredients.
Step 2: Mash and Mix
In a large bowl, combine the mashed sweet potato, cooked turkey, egg, and oat flour.
Mix everything together using a spoon or clean hands until the dough is evenly combined and cohesive.
The sweet potato helps bind the mixture naturally and adds a touch of sweetness dogs love.
If the mixture feels too wet, add a bit more flour. If too dry, add a spoonful of mashed potato or water.
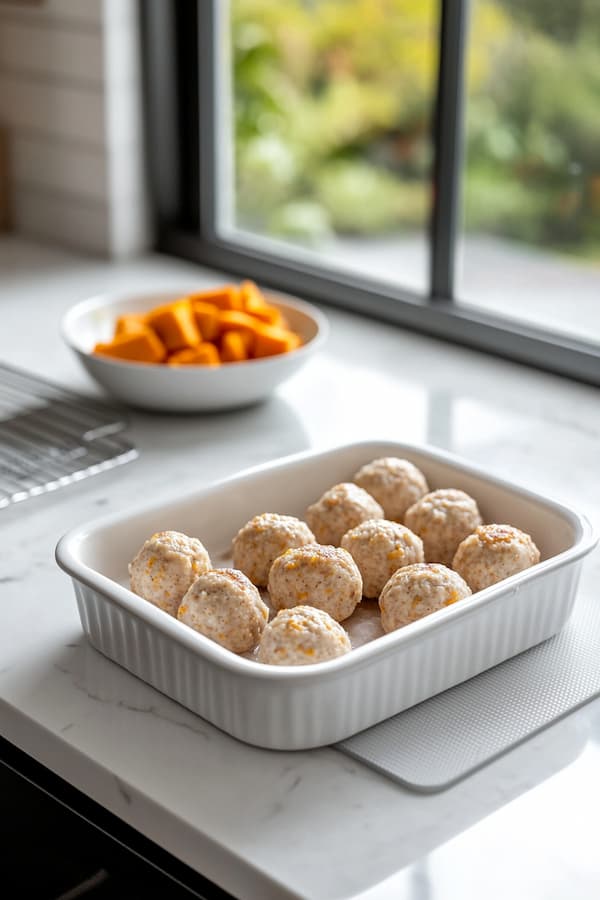
Step 3: Roll Into Meatballs
Scoop small portions (about 1 to 1.5 teaspoons) and roll into bite-sized meatballs using your hands or a spoon.
Try to keep them uniform in size so they bake evenly. These soft meatballs are great for puppies, seniors, or dogs with dental sensitivities.
Optional: Lightly wet your hands to prevent sticking while rolling.
Step 4: Bake
Preheat oven to 350°F (175°C). Line a baking sheet with parchment paper or a silicone mat.
Place the meatballs spaced evenly on the tray and bake for 18–20 minutes, or until they’re firm to the touch and slightly golden on the outside.
Avoid overbaking to keep them soft and easy to chew.
Step 5: Cool, Store, and Serve
Let the meatballs cool completely on a wire rack or the baking sheet.
Store in an airtight container in the fridge for 4–5 days, or freeze in single-serve portions for up to 2 months.
Serve as a tasty reward, meal topper, or quick grab-and-go snack your dog will devour.
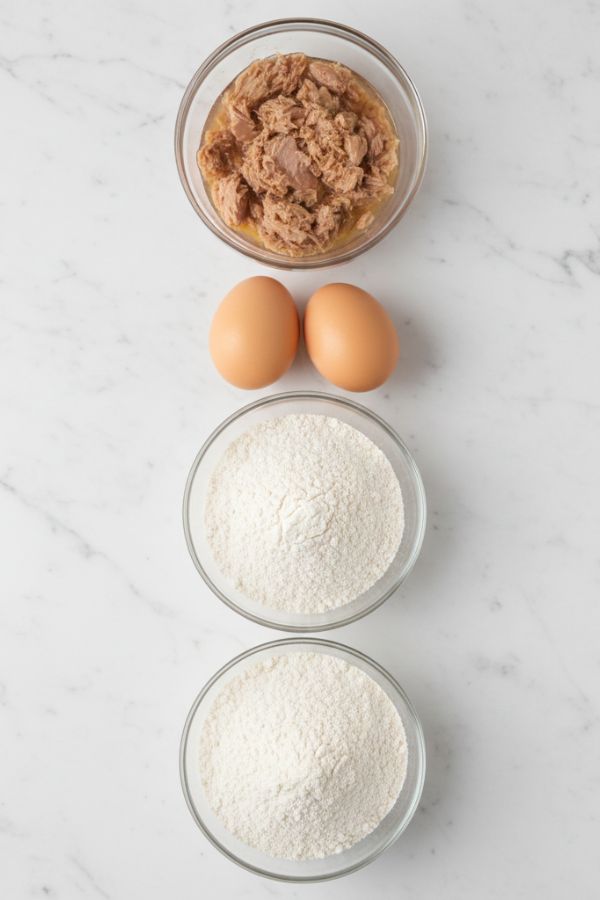
#4. Tuna & Egg Snack Squares
Ingredients:
- 1 can tuna in water (drained — no added salt or oil)
- 2 eggs (adds protein and binds the mixture)
- 1/2 cup oat flour or ground oats (for structure — gentle on digestion)
- Optional: 1 tbsp finely chopped spinach or parsley (adds nutrients and freshness)
Instructions:
Step 1: Preheat the Oven
Preheat your oven to 325°F (160°C).
Grease or line a square baking pan (like 8×8 inches) with parchment paper. This prevents sticking and makes cleanup easy.
Step 2: Whisk the Eggs
In a medium mixing bowl, whisk the eggs until well beaten. This ensures a fluffy texture and helps bind everything evenly.
Step 3: Mix in Tuna and Flour
Add the drained tuna and oat flour to the eggs.
Stir thoroughly, breaking up the tuna with a fork or spatula until it’s evenly distributed throughout the batter.
If you’re using spinach or parsley, fold it in now for extra nutrients and color.
Step 4: Pour and Smooth
Pour the mixture into your prepared baking pan. It should be thick and spoonable, similar to brownie batter.
Use a spatula to spread it evenly and smooth the top so it bakes uniformly.
Step 5: Bake
Place in the oven and bake for 25–30 minutes, or until the top is firm and lightly golden.
Check with a toothpick — it should come out clean when inserted in the center.
Step 6: Cool and Slice
Allow the baked mixture to cool completely in the pan before cutting.
Once cool, slice into small squares or tiny training bites. The texture should be moist but firm.
Step 7: Store and Serve
Store in an airtight container in the refrigerator for up to 5 days, or freeze in small portions for longer storage.
Rich in omega-3 fatty acids, this treat is especially good for dogs with dry skin, dull coats, or picky appetites—and perfect for training rewards!

Portioning & Feeding Guidelines
Because these treats are made with real meat, they are much richer and more calorie-dense than a standard biscuit. While they are a fantastic protein boost, they should be treated as a high-value reward rather than a snack-time free-for-all.
If your dog is used to a strictly kibble-based diet, introduce these slowly, 1-2 treats per day. The high protein and fat content in beef or tuna can be a bit much for some sensitive stomachs if given in large quantities all at once.
Storage Tips for Meat-Based Dog Treats
- Fridge: Store in an airtight container for 4–5 days
- Freezer: Freeze in small portions for up to 2 months
- Always cool fully before storing to avoid condensation and spoilage
- Label your bags (unless you like mystery freezer cubes)
Is Cooked Meat Safe for Dogs?
Yes, absolutely—but only when it’s plain and fully cooked. Meat is a fantastic source of protein, amino acids, iron, and B vitamins, all of which support your dog’s muscle development, energy levels, and immune system.
Avoid seasoning, salt, garlic, onions, marinades, and any kind of sauce. These can upset your dog’s stomach—or worse, be toxic. Stick with clean, simple cooking methods like boiling, baking, or sautéing without oil.
Quick tip: Ground meats like turkey, chicken, and beef are super versatile and easy to work with in homemade treats.
Grain-Free? Here’s How to Modify
If your pup has a grain allergy or you just prefer to go grain-free, you’ve got options. These flour swaps work great in meat-based recipes:
- Coconut flour: Light and naturally anti-inflammatory
- Chickpea flour: High in protein and great for dense treats
- Mashed sweet potato or pumpkin: Acts as a binder with extra fiber
Start with small amounts and adjust the texture as needed—grain-free flours can absorb moisture differently than oat or wheat.
Little Disclaimer
I’m so happy to share these meaty recipes with the PupTaste community, but I want to remind everyone that I am not a professional pet nutritionist. These recipes are intended as supplemental snacks for healthy, active dogs and should not be used as a replacement for a complete, balanced commercial or vet-approved diet.
Please consult with your veterinarian before feeding these to your dog if they have specific health issues like kidney disease, pancreatitis, or severe food allergies. It’s also a good idea to chat with your vet if you’re unsure about the best portion sizes based on your dog’s specific weight and activity level. Always make sure the meat is cooked plain and is completely free of harmful seasonings like garlic or onion!